Wednesday, January 23, 2013

Whadda We Eatin' Wednesday - #2 - Recipe for Crustless Mini Quiches!

Welcome to the second edition of...

"Whadda We Eatin' Wednesday!!" 

Today, I want share with you a recipe that is so easy to make and delicious, and is a hit for parties or just an easy, yummy breakfast or snack!

But, before I do...I just wanted to say how excited I am that one of my recipes was featured on one of my FAVORITE BLOGS!!! 

Stone Gable Blog has a beautiful blog and each week they host a link party called "On the Menu Monday", and feature some of their favorite entries from the previous week. Well, this week, my recipe for BAKED CHEDDAR BROCCOLI RICE CUPS was a featured recipe!

Thank you so much, Yvonne!  This is an unbelievable compliment, coming from one of the most amazing hostesses and home fashionistas out there!!!  =D

Ok...onto today's featured recipe... 


"Crustless Mini Quiches!!!"

I found this recipe on Pinterest and it has been my go-to breakfast food lately!!   I also took some of these to a women's Bible Study Breakfast a few weeks ago and they were gone so fast!  Everyone loved them and was asking for the recipe, so I thought I'd share it here as well!  
They are so easy to make!

Here's what you need....this makes about 6 mini quiches, but you can double this recipe to make 12, which is what I do. 

4 eggs,
1/4 cup of heavy cream (or half n half),
A pinch of salt (to help mix the eggs more evenly) and,
Your favorite omelet ingredients

For this batch, I used Tostitos NEW Chipotle Cantina Salsa (YUM), cheddar cheese, and real bacon bits, but I've also used ham and swiss, and bacon and cheddar, you could even try a spinach and feta version...I bet that would be YUMMY!


After you mix the eggs and the cream, you pour the mixture  into WELL greased muffin-tins....only about half way full. 

Then I added a teaspoon of salsa, a small handful of cheese and a sprinkling of bacon bits into the muffin cups.  The original recipe (found here) said to try not to use more than 2 tbsp of stuff in each muffin tin.


They you cook them at 350 for 20-25 minutes.


They puff up pretty tall when in the oven, but they will "deflate" a bit once you take them out.


They are so cute!  And SOOO tasty!


These also reheat great, so I make 12 at a time and then snack on them for several days! 

I hope you enjoy them!  If you try them, please let me know what YOU think!!!  Thanks again!

By the way, I'd love to hear from you!  Please feel free to leave a comment anytime or even come like me on Facebook.   Thanks again for stopping by!

Enjoy!!!

~The HOME GIRL

This post is added to....
Wicked Awesome Wednesday
Foodie Friday
On the Menu Monday
Homemaking Link Up
Yolo Mondays
Inspire Me Monday
Two Girls and a Party

Monday, January 21, 2013

TABLESCAPE TUESDAY! Winter Woods With White!

Hi all!

Welcome to my first "TABLESCAPE TUESDAY"!

This past Sunday, we had yet another wonderful "Sunday Family Dinner".   This is our third in our new tradition of weekly special meals with my family.

If you're new to my blog, one of my New Years Resolutions was to start a weekly tradition of a "formal dinner" with my family every Sunday that we're in town.  

We eat dinner together almost every night at our kitchen table, but it's mostly casual food that is easy and cheap!   

With this new Tradition, every Sunday, I'm decorating our Dining Room Table with a fancy tablescape, making a more formal-style meal, and we're dressing up and sitting down as a family to dine "in style"!  =D  

I'm hoping that this is a tradition that we will continue for many years, even after the kids are grown and have their own families. 

So far the kids have really enjoyed it, and I'm trying to have them help with this special meal so they really feel like they're a part of making it happen!


Sooo...for the table, I went with a "Winter Woods and White" kind of theme. Cuisine Kathleen was having a tablescape challenge of sorts, to create a wintery tablescape for her link party "Let's Dish".  This was a fun one to put together...I was trying to make it feel like a snowy wooded path in the winter. 

I even filled some of the table space with some decorative rocks I got on clearance at Target last month.  I also lined the inside of the tea light candles as well as a pillar candle on the buffet with these rocks.


I found these cutie pie bird cages at Ross for $2.49 that were filled with woodsy potpourri that I thought would be really cute to add to the table.  I then found some cute greenish/brownish pedestals at Goodwill that the bird cages could fit perfectly on to give them a little height!   I decided to empty the potpourri elements and then put a candle and a few potpourri pieces in there with the candle.


This centerpiece is made from a few great finds...The brown wire basket at the bottom and the green candleabra were both Goodwill finds. I got the greenery liners from our trees outside. The potpourri from the birdcages lined the inside . I really like how it came together and the potpourri smelled very woodsy and nice!


These little winter birdies were a great find from Pier 1 in their Christmas clearance area. Less than $2 each and they were so cute! I just got two and they'd actually fit great into the birdcages too!!  For this table, it's almost like they escaped their cages and were roaming freely through the "wooded path"  complete with decorative ROCKS and everything...haha!


Each place setting had a dark brown charger plate, (Michaels had these on sale for $1.50 last week!) Ivory colored dollar store plates, multi color brown salad/dessert plates from Goodwill, brand new cloth napkins from the Dollar Tree, a place setting with their names, and a few washed leaves from outside. The stemware was inherited from my grandmother.  I love how it all came together!


This beautiful wooden bowl at the buffet was a garage sale find years ago.  $20, but I believe it must have been worth a lot more because it's real wood!  I put it up on a Candle pedestal for a little height


This tray is actually a wooden lazy susan that I used to have in the kitchen before I de-cluttered.  I put it on candle pedestal and added a dark brown charger to cover some of those lighter wood tones.


On to the Menu!

I took my daughter to her friend's Birthday party earlier in the day on Sunday, so I needed to have my table all set up the day before and a very easy to make, yet special dinner.

So I got out my handy Crock Pot and I made a "RUSTIC ROAST DINNER!"   I found a great new roast recipe on Pinterest recently, so I thought I'd try it out!   (the link turned out to be bad, so I'm not sure who to credit this recipe to...if it is yours, please let me know so I can give credit where credit is due!)  =)

It turned out really good...I loved the flavor!  I modified it slightly...Here's what I did.....


For the ingredients I had a rump roast, a package of baby carrots, two cans of canned potatoes, (I would have used fresh, but they were actually SPROUTING, so I thought it might be best NOT to include those...haha!)  1/2 cup of water, one packet of ranch dressing mix, one packet of Italian dressing mix and one packet of brown gravy mix.   That's it!!!

 I put the carrots in the bottom of the Crock Pot.   I seared the roast for a few minutes on each side in a pat of butter and a little olive oil...just to get the edges of the roast a little brown (a little trick I learned from my mother to keep the juices in!) then put it in the crock pot and put the potatoes around it.


In a separate bowl,  (a princess bowl of my daughter's, to be exact...haha) I mixed the 1/2 cup of water, and the three seasoning packets...it made a flavorful sauce with just a hint of a "tangy" flavor to it!   


Then I poured the mixture over the top of the roast and potatoes.  


Eight hours later, THIS is what I had!   I sprinkled some parsley on it for a garnish and I love how it turned out!!!  The potatoes and carrots had such a delicious flavor from the roast and seasonings as well!  It was wonderful!!!


Here is our whole spread....The "Rustic Roast Dinner", some Four Cheese mashed potatoes (the instant kind from Aldi...shhhh...don't tell the kids!!!)  And some pan-seared Green Beans with slivered almonds.  Also a super easy recipe to make and it turned out yummy!

The kids enjoyed helping with the table setup, and other than having them continually asking, "Mommy, why do we have ROCKS on the table??"   I think it went over really well!   

Hope you enjoyed this week's Tablescaping Tuesday!  Thanks again for stopping by!  I'd love to hear your thoughts on what you think!  

Were the rocks on the table too much?  haha!

~The Home Girl


This post is being added to:
Tabletop Tuesdays
Love Makes Good Cakes
The Creative Spark
Wow Us Wednesday
Tablescape Thursday
Let's Dish
TUTORIALS, TIPS AND TIDBITS
Seasonal Sundays


Makeover Monday - Kitchen Desk

Happy Monday, everyone!

If you happened to catch last week's Kitchen Makeover, and noticed the picture of a nicely cleaned and organized kitchen...


There was ONE small part of the picture I did NOT show you.

That part of the picture was a small desk area next to the ovens in our kitchen. I cleaned the rest of the kitchen area that night, but this desk with a job in itself...to be tackled at an entirely different time!

Here's what you DIDN'T see in that picture:


WHAT A MESS!  As you can see, clutter was everywhere. 

On top of the refrigerator...we had candy from Halloween and even LAST VALENTINE'S DAY!!!  And some electric lanterns that we rarely use...only in the case of a power outage...which doesn't happen often!


On the shelf above the desk and fridge area, We had packages of Batteries, and thumb tacks!  SOOOO decorative...NOT...ugh!


And on and around the desk itself...the kids' lunch boxes, (which we use when the kids go to co-op classes or camp days, so they needed to be accessible)  plastic bags for our doggie's cleanup on walks, cookbooks (that never get used because I find most recipes online now anyway)  and other miscellaneous JUNK!


This area needed a complete overhaul!

So, I set to work again. I put the cookbooks in our guest-room/study to only be taken out when needed.  The plastic bags went into an already-installed bag holder inside a cabinet under our sink.  Why I never used it truly boggles me now!  lol

I pitched a lot of stuff we weren't using, and put stuff in their places that we were using.

I went to Michaels and bought a few great storage boxes on sale. I wanted them to be functional as well as decorative. This would be where I stored lots of clutter. 

I found 3 "memory boxes" for 2 dollars each, and 1 larger decorative box for 30% off the regular $8.99 price tag. I was very happy with these finds.  

Now to put the clutter in them.


In this box, above the microwave, I folded the kids' lunch boxes tight and put them in there.  This box has a magnetic close lid, so it keeps the lunchboxes from lifting the lid!  The perfect solution to those unsightly lunchboxes!


I cleared the clutter and got rid of some of that very old candy, consolodated those new packages of batteries and took our nail polishes and nail stuff out of the cabinet above the microwave and I put all those things in these three "memory boxes".  They all fit great!   I then put those lanterns into the cabinet with the newly added space I had made from clearing out clutter in there!


I took all the old pictures and drawings off the cabinet doors and the side of the fridge....I'm going to find a new place to organize the kids' masterpieces!  =)   My goal is to make something like this for each of the kids and we'll display their latest drawing or test with a great grade:


It's made from a cookie sheet!!!  Pretty amazing, huh???


Here is the finished product!   Such a difference!


It feels so nice to have a clean kitchen!  =D

Thanks for joining me for this "Makeover Monday"   I hope you have a great start to your week!


This post was added to the following:
Between Naps on the Porch - Metamorphosis Monday
My Uncommon Slice...Tuesday Treasures
A Humble Creation - Monday Makeover Party

Friday, January 18, 2013

FIVE FABULOUS FINDS FRIDAY #2

Welcome to the second edition of...

Five Fabulous Finds Friday!

Today I have some really great things to share with you, including an amazing photography tip, a new product in my kitchen that is saving me a ton of time,  a gorgeous, inexpensive lamp makeover, a fantastic article on "real change", and a super easy and delicious recipe for low carb garlic "breadsticks"!

Let's get started!

#1.  One of my favorite and most informative blogs is a website called Between Naps on the Porch!   It is an insightful and inspiring blog about all things home!  

Susan writes about everything from home decor and gardens, to DIY projects, to beautiful house tours and tablescapes...and much more.  She even has a great section with tips for bloggers!   

I'm quickly learning that a big secret to creating a great blog is to be able to take great pictures.  I'm definitely NOT there yet, but I'm learning a lot, thanks in part to Susan at "BNOTP"!   In this article, she shares a really neat tip and talks about a special time in the day when our pictures can really stand out....the "Blue Hour". 
The above picture is from Susan's site, as is this article.  Notice how warm and cozy this room looks, and notice the GORGEOUS blue color out the windows???  If you like photography, you'll love this tip!   

The Secret of the Blue Hour!  

#2.  If you're looking for an inexpensive way to jazz up a lamp for the chilly winter months, and you have 3 dollars and your lamp, you'll want to check out this elegant lamp makeover!


Beth Bryan at "Unskinny Boppy" has made an ADORABLE new lampshade from a thrift store sweater.  This looks like it belongs in Better Homes and Gardens magazine!  

She's entered into a contest for the best lamp makeover at Lamps.com, so while you're visiting, I'm sure she'd appreciate your vote if you have the time!  

The picture above and the entire tutorial on how she made this lampshade is found at this link:

$2.99 DIY Sweater Lampshade Makeover

I really want to make one of these!

It's also worth checking out her site for the gorgeous room decor where this lamp now resides!   =)

#3.  I am ALL about easy when it comes to making meals.  Being a homeschool mom with a career and a blog keeps me hopping, so if I can save time in the kitchen...count me IN!

When my father (who is an AMAZING cook) was here for Christmas he was telling me about one of his favorite new tools in the kitchen...the STICK BLENDER!   

He was going on and on about how much he loved this thing for making smoothies and gravies and all kids of stuff.  I have my own food processors in two different sizes and a blender(which are up in my cabinets, only occasionally used)  so I kind of just listened to my dad, thinking.."That's great, Dad." but not really considering getting one.  

Then, a few days after Christmas, a stick blender shows up from my dad that he got from amazon.com! 


About 2 weeks later I decided to just try it out.  

I can't believe how much I LOVE THIS THING!   It has simplified my cooking tremendously and is so much easier to clean than my clunky food processors!   
I am able to make one of my favorite low carb side dishes, Mashed "Fauxtatoes" (recipe on that coming soon)  with ease, now that I have this very versatile tool.   I highly recommend getting one if you haven't got one already.  I'm a believer!  lol   If you are looking at buying one, try to get one where you can take off the blade attachment...it makes them SO easy to clean!


#4.  For my "recipe" find, I'd love to share a recipe with you for garlic cheesy "breadsticks." 

As much as I love living the low carb lifestyle, there are some things that I just miss sometimes. One of those things is Olive Garden's garlic breadsticks. They are so buttery and delicious!

Problem is, those yummy bread sticks will RUIN a low carb diet. So, I ended up finding a way to make a buttery garlic cheesy "bread" stick that totally takes away my cravings.

I am pretty sure I found this recipe on a low carb website, but I am afraid I can't remember which one, since I've been using the recipe for years!

The best part is, these are so easy to make and so fast that I can make it anytime as a yummy snack. It only has 3 ingredients! String cheese, butter, and garlic powder!


First, I melted a pat of butter in a large pan. There are a few tricks to getting these just right. 

One, make sure your string cheese is RIGHT out of the fridge.  

Second, make sure your heat setting is right.  I put mine right between medium-low and medium.  If you put it too high, it will burn without heating through, if you put it too low it will melt (either way is still delicious, but there's a certain consistency that comes with putting it on the right temperature.)


Next up, I sprinkle garlic powder over the cheese sticks in the pan.  To taste.  I am definitely not stingy with my garlic powder...haha!


Keep an eye on them and flip them over when they start to turn golden brown or even a little before that, and you can just keep turning them until both sides are a golden brown. 

I let them cool a bit until they are easy to pick up with my hands and dip them in my favorite pasta sauce!  (I was trying to garnish my plate with some dried italian seasoning...it didn't look as nice as I'd hoped...haha!)

Guilt free and delicious, I love these for a quick and easy snack.  AND I never have to crave garlic breadsticks again, as long as I'm making this recipe!!!  


#5.   Are you wanting to see REAL CHANGE in your life in 2013?   I am...definitely!

I first became acquainted with Ann Voscamp's writing when a friend recommended her book "1000 Gifts" to me late last year. She is a homeschool mom of 6 and an author with the gift of words!   


Her writing style is like reading poetry, with vivid descriptions that you can almost see as you read them, and beautiful nuggets of wisdom that are worth more than gold! 


 I needed that book at that time in my life. 


Here is a wonderful post from her blog site with a challenge to create REAL change this year.  This post even includes a free printable to help with the organization side!  


She is a true inspiration!   Here is the link if you'd like to check it out!


How to create real change - Part 1 - How to begin New  Habits (Free Daily Planner Download)


Well, that's it for this week's 

"FIVE FABULOUS FINDS FRIDAY"!  

I hope you have a wonderful weekend and I look forward to hearing from you, if you try out any of these "fabulous finds", I'd love for you to share them with me!  

~The HOME GIRL
This post was added to the following sites:
Common Ground's Be Inspired Friday
The Foley Fam's Sunday Fun Day
Stone Gable's On the Menu Monday

Thursday, January 17, 2013

"THRIFT ADDICTION THURSDAY" - Bargains Galore!

Hello HOME GIRLS!!!

Ok, so I've decided to kind of categorize my days of the week in my blog!

Today is: 

"THRIFT ADDICTION THURSDAY!"

SO for my first Thrift Addiction Thursday, I'd like to share some of my awesome Thrift store finds, massive sales items, etc.   This will be a fun day..at least I will have fun writing it!  

Eventually I'd love to open up the blog and make a "link party" where we can all share our thrifty treasures...but first I have to learn how...I'm still a bit of a newbie here!  =)

Before we start the "showcase" (haha), I just have to say how much I LOVE shopping at thrift stores!  I love that I can get some great finds at great bargains, and I LOVE that each thrift store I go to, the proceeds from my purchases go to help others.  Our church has an amazing local thrift shop that carries some of the neatest stuff and the proceeds go to help out the church's foster parenting agency.  Since we adopted two children from foster care, this cause is near and dear to our hearts, so I think it's wonderful that I can have the double bonus of finding great stuff as well as giving to a great cause.  Goodwill stores and Salvation Army stores both also go to causes near and dear to my heart.  AND I recently found a new one that helps women in dangerous or abusive domestic situations get the help they need!   I think that is awesome!

Ok...onto the bargains!  Here are some of the super cool finds I got this week at the thrift stores.


I took my "little home girl" shopping with me one day, after dropping my "little home boy" off at one of his co-op classes.  We went early, just shortly after it opened and there were some super cute things there.

For our casual dining, I found these ADORABLE bowls for ice cream.  We are a family who likes our desserts at night (as long as we ate all of our dinners, that is...haha!)  and these cutie bowls were just 


50 CENTS EACH!  


My daughter thought they were great and that was just what I needed to transition her from her very little girl plastic plates with Dora the Explorer, to a more mature, but still kid friendly and fun set of dessert bowls!  They had 4...I bought them all!!!  =D


Next up, I saw this GORGEOUS serving bowl...also at Goodwill!  I like having a lot of stuff in Ivory color because it just goes with so much!  I was also really drawn to the shape of it...kind of unique and really pretty!   It was $4!


It was taped shut at the store, so when I got it home, I opened it to find a BONUS...this could function as TWO SERVING BOWLS IN ONE!   The top could be turned over to make a really nice looking serving plate!  I was so excited!


Next up, I found this adorable decorative bowl at Salvation Army.  

Every Wednesday our Salvation Army stores do "Wacky Wednesday" where the entire store is 50% off!  That is where I found this beauty for $5!  I love the look of red toile/transferware style.  This was an FTD florist vase and I just thought it would be perfect to hold a nice candle, some red roses for Valentine's Day or even use it as a base for a serving bowl!  


And last but not least....I am a fairly new tablescaper, and so in the fall, I didn't have a whole lot for my Thanksgiving Holiday table.  Now, I'm trying to remedy that!  I just LOVE fall decor anyway, so when I saw these two pieces at Goodwill, I thought...

"You will be mine...oh, yes....you WILL be mine!" haha!  

The small serving plate on the left actually goes with a large serving platter I bought recently for $3 about 2 weeks ago.  I was so thrilled to find this!   

The prices on these were $2 and $4.

Thanks so much for joining me for this first installment of 
"THRIFT ADDICTION THURSDAY!"  I hope this inspires you to go out and find and share your own treasures at your local thrift stores!  You just never know what you're going to find!!! =)

The HOME GIRL!

This post was added to the following link parties:
Nifty Thrifty Sunday
Masterpiece Monday
You're Gonna Love it
Tuesday's Treasures
Tuesday Confessional
Nifty Thrifty Tuesday

Wednesday, January 16, 2013

Whadda We Eatin' Wednesday? Recipe for a GREAT Low-Carb Pizza Crust!

Hi All!

Well, it's Wednesday...yup...Wednesday!  Where has the week gone?!?!?

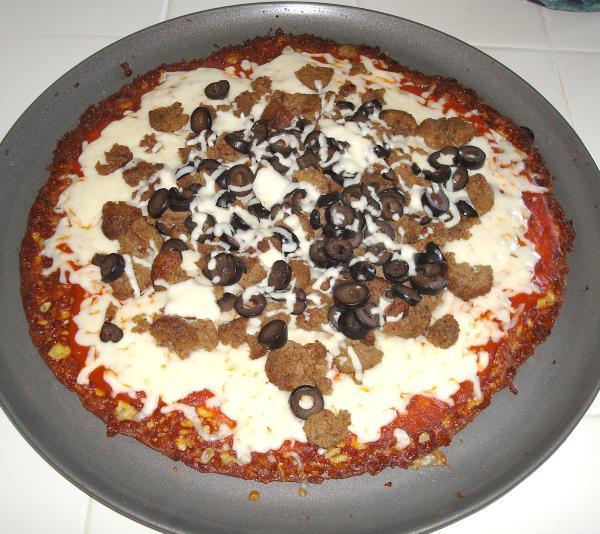
Yesterday we had a new friend and her family over to our house for a little playdate for the kids and just to hang out!  I just love her!  She is the sweetest gal and has a fun personality and she is also living the low-carb lifestyle like me.  I picked up a pizza from Aldi (don't even get me started on my love for Aldi!  haha!)  for the kids and husbands, but we needed something low carb for us.  So, I made US a Low-Carb pizza!!!  I've tried many different kinds in the past, but this one is my favorite by far!  It tastes like a real pizza!

I got this recipe (and the pictures, since I forgot to take any) from this site: 
NancyElle's Thin and Crispy Pizza Crust

Next time I make it (which I KNOW will be soon!) I will make sure to take some pics and put them up in place of these!

First you heat your oven to 450 degrees.
Then you mix 3 eggs and 3 cups of mozzerella cheese
Add 1tsp of garlic powder (or more to taste)
1tsp of basil  (I used Italian Seasoning instead and loved the result)

And that's it!  Cheese, eggs, garlic powder and italian seasoning (or basil)!!!   I put it all in a food processor and watched it SPIN!!!

Then you press the mixture into a well-greased pizza pan or cookie sheet and bake for 10-15 minutes or until golden brown. Then you flip it over.  (I actually used a pizza stone..well-greased...the consistency came out better than when I made it on the cookie sheet in the past, but it was harder to lift off and flip and a little of the mixture stuck to the stone...didn't matter in the end though because that side was covered with pizza sauce and cheese and all.)


Here is what it looked like for NancyElle  (mine was more smooth on the top...and more rough on the bottom...haha!)


Then you add 1/2 cup of pizza sauce (low carb)  your cheese (around 1 cup) and any toppings you want and put it back in the oven under the broiler setting until the cheese gets all melted and bubbly!   It was so delish!!!


UPDATE (1-22-13)!  I have since re-made this pizza and took some "after pics" so you can see what I did.  This time I made it on a rectangle cookie sheet for a squared off pizza.  It turned out great!  Here are some pictures of the pizza I made today...


I loved the bread-like texture of this pizza crust...


I loved that I could hold my piece in my hand and eat it just like everyone else was doing with the "regular pizza"! 


I love that I can have PIZZA and still lose weight!!!   

And...I love having a friend I can low-carb with!

This is such a great and easy pizza recipe for people trying to watch their sugar/carb intake as well as people who are diabetic because it only has just around two carbs per slice!  

Well, that's it for me today.  Thanks for stopping by!  I hope you enjoyed and I'll talk with you again soon!  


This post was added to:
Lipgloss and Crayons' YOLOMonday
Lil Luna's Link Up Party
Mom's Test Kitchen Test Meal Monday